For example, even when UseOutbox is on, a user can turn off the Outbox for FormSubmission emails, so that emails sent in response to forms being submitted are sent right away and bypass the Outbox.
Email Types that have their own options will always use that option and ignore the main Outbox setting, with some exceptions:
How overrides work.
|
Setting
|
General
|
Email Type Override
|
Explanation
|
|
UseOutbox
|
Off
|
Cannot override.
|
You cannot turn UseOutbox on for a specific email type if it is off on the General setting
|
|
UseOutbox
|
On
|
Can override
|
A user can override and turn off UseOutbox for any email type when the General setting has it on.
|
|
DelayTime
|
Any number
|
Can override
|
Regardless of the General setting, a user is able to change this and override it for the email type to increase or decrease this number as needed.
|
|
Offline
|
Yes
|
Cannot override
|
Regardless of the setting for the email type, emails will not be sent automatically when the General setting is Offline.
|
|
Offline
|
No (Outbox is online)
|
Can override
|
A user can override and turn it Offline for a specific email type.
|
Throughout this article, when we refer to an “option” (UseOutbox, TimeDelay, Offline), the intent is the option result based on the General setting and the email type override.
Outbox Settings Explained
UseOutbox
When UseOutbox is ON, emails that are “sent” will not actually be sent but rather they are first put in the Outbox before being actually sent. How they are sent from the Outbox depends on the other settings (DelayTime, Offline).
Turning UseOutbox to OFF will not affect emails that are already in the outbox. Those will be sent according to their ScheduleSendTime. To stop emails in the Outbox from being sent, you can set the OffLine option.
DelayTime
When UseOutbox is turned on, the DelayTime defaults to 30 minutes. You can adjust this to any value. If you don’t want a delay at all, you can turn off UseOutbox to have the emails sent directly.
When an email is put in the Outbox, a ScheduledSendTime is added to that email. This time is calculated by adding the DelayTime to the current time. Emails that are in the Outbox are sent automatically as soon as their ScheduledSendTime comes.
If you want to disable automatic sending of an email that is in the Outbox, you can set Outbox to be Offline (which will affect all emails) or you can Freeze that specific item.
Changes made to the DelayTime option do not affect emails that are already in the Outbox.
Offline
When the Outbox is Offline, emails will remain in Outbox indefinitely. The email will never be sent automatically.
When the Offline option is set to YES, the DelayTime is not relevant but the ScheduledSendTime is still being calculated and added to the Email. If the Offline setting is turned ON the ScheduledSendTime will be used to send the email automatically.
User Roles
A new User Role called Outbox is available under Settings > Users. This role will enable you to restrict users from accessing the Outbox Settings and the Outbox.
In order to access the Outbox, a user needs to have permission to the Outbox role.
In order to access the Outbox Settings, a user would also need to have the Settings role.
Even when a user has access to the Outbox, some Email Types may not be visible to that user based on other roles they may be restricted with..
The following table maps roles to Email Types to the role required in order to view the corresponding email type in the Outbox.
|
Role
|
Email Type
|
|
Transactions
|
Thank you, Invoice, Notify, Card Declined, Renew Pledge, Card Expired
|
|
Yahrtzeits
|
Yahrtzeit
|
|
Contacts
|
Birthday
|
|
Webforms
|
Web Forms
|
When there are items in the Outbox, the Dashboard will show Outbox items totals for each Email type and have a link to the Outbox.
The Main Menu also has an Outbox link under EMail.
Outbox Features
Click the Outbox link on the main menu (under Email) to take you to the Outbox. You can also click the link on the Dashboard when there are items in the Outbox. You will see a list of all the emails that are in the Outbox waiting to be sent.
Email List
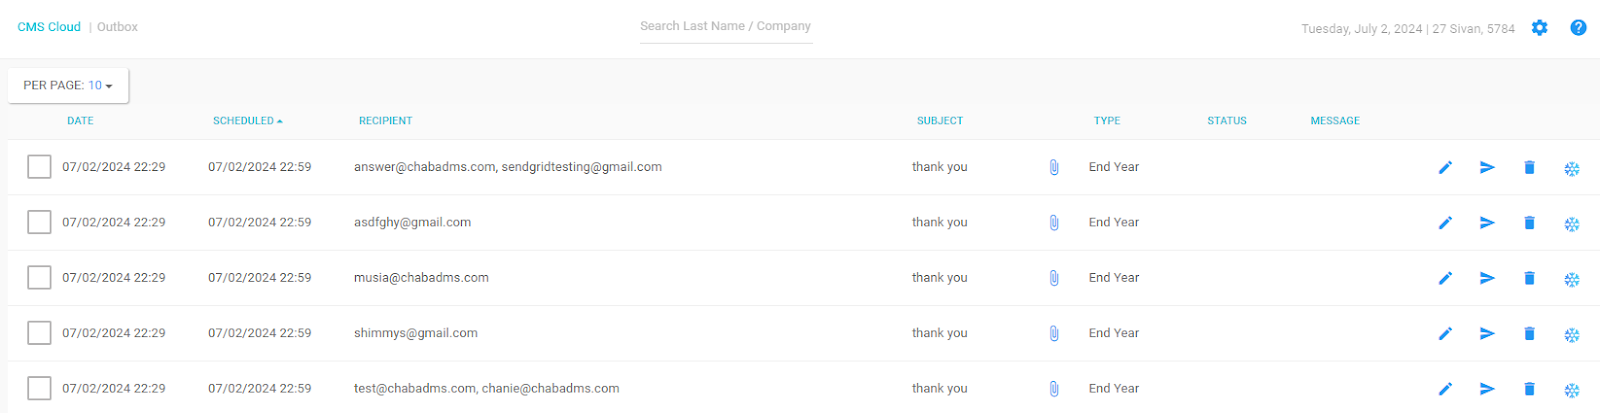
Sorting: You can sort the items in the list by any column. Click the column header to sort by, click it again to sort in reverse order.
Clicking on the paperclip (attachment icon) of an item in the list will show the attachment.
List Item Actions
Each item on the list has the following action buttons.

Edit: You can edit the emails and change the subject, body, scheduled date and time, from name and from email. When in the details of an email, you can also view the attachment and manually add additional attachments or remove the attachment that is there.
Send/Unsend: Clicking Send will send the email right away (in 3 seconds), regardless of the ScheduledSendTime. There is a 3 second delay during which you can cancel the send.
Delete: You can delete an email from the list.
Freeze/Unfreeze: Clicking Freeze will freeze a specific email from being sent. Emails that are frozen, will never be automatically sent until it is unfrozen (or until manually sent).
A Frozen email is like Offline, but only for the specific email.
Batch Actions
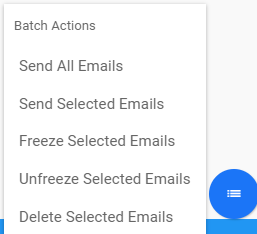
You can check multiple emails from the list and perform Batch Actions.
Send All / Send Selected.
Send All will send all the emails even if they are not checked.
Send All Selected is the same, only is limited to those that are checked in the list.
(Important: Keep in mind that if user doesn’t have permission to view certain email types, Send All would not include those types).
Freeze / Unfreeze Selected
Select multiple items in the list and click Freeze or Unfreeze them in a batch batches. This only works for those that are checked.
Delete Selected
This allows you to delete multiple emails that you select. This too only works for those that are checked.
Offline / Online
A status bar indicates if Outbox is online or offline .

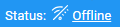
When the Outbox is online, clicking the Online link will take it offline.
When the Outbox is offline, clicking the Offline link will bring it online.
This is the Main Outlook status setting and not related to Email Types, even if some email types are overriding the option for that type.
Taking Outbox offline will suspend all emails in the Outbox from being sent. This is an important safeguard if the user feels that something is wrong and needs to "pull the plug" on the emails that are in the Outbox