Importing Submissions into CMS Cloud
Submissions that come through your website via CMS-connected forms can be automatically matched to existing records and imported into your CMS Cloud database. This guide explains how the process works and how to review submissions before importing.
Quick Steps
After opening the form that has submissions from the Dashboard.
- Click AUTO MATCH.
- Review the results and approve each submission.
- Click IMPORT.
The sections below describe these steps in detail.
How Submissions Arrive in CMS Cloud
Whenever someone submits a CMS-connected form on your website, the entry is received by CMS Cloud and placed in the Submissions area. Submissions remain there until you review and import them.
You do not need to import submissions immediately—many users import weekly or after several submissions build up. If the form included a payment, the donor’s card has already been charged. Importing simply creates or updates records inside your database.
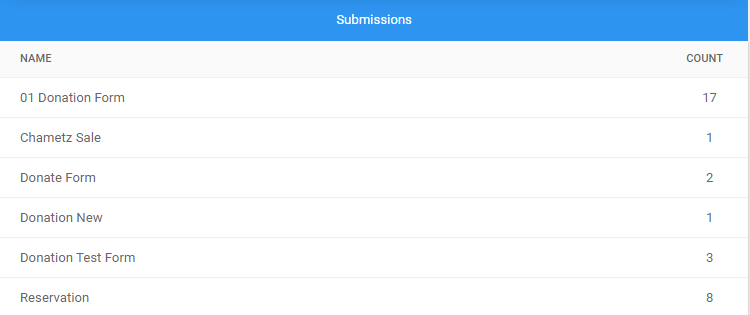
On the Dashboard, each form that has pending submissions displays the number of unimported entries:

Click the form name to view its list of submissions:

This opens the submission review page.
Step 1: Auto Match
On the submission list, click Auto Match. CMS Cloud will attempt to match each submission to an existing family record using the following rules:
- Last Name — exact match, and
- One of the following:
- Address — partial match using street name + ZIP/postal code
- Email — exact match
- Phone — exact match (ignoring spaces, punctuation, and formatting)
If a submission is matched, the contact icon turns blue. If no match is found, it remains black.
Step 2: Review and Approve
You can approve submissions without reviewing them, but we recommend reviewing each one to avoid duplicate records or incorrect matches. A name may be spelled differently, or two people with the same last name may live on the same street.
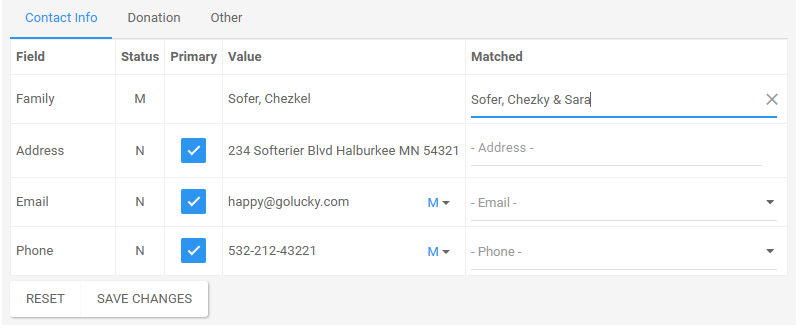
Click Expand (or click anywhere on the submission row) to see how each part of the submission was matched:

Understanding the Status
- M — Matched
- N — Not Matched
If something is not matched, you can manually match it:
- Start typing the last name in the Family field under the “Matched” column.
- Select the correct family when it appears. The status will switch to M.
- You can also manually match Address, Email, or Phone if needed.
When the Family is Matched (M) but one of the other data points are not matched, they are considered New (N) for the Matched family. In the above screenshot, The Family Sofer, Chezky & Sara already exists and is considered Matched. The Address, Email and Phone are all New (N) and will be added.
When new information is added, there is an option for Primary. By default new information will become Primary. To over-ride this behavior, you can uncheck the Primary check box.
For new Emails and Phones to a Matched family, you can control the M/F drop-down. This is useful for when there is more than one adult (him or her) in the family but the first name submitted doesn't match. In this cse, you can choose whose email or phone this is.
If a submission cannot be matched, importing it will create a new family record.
If a matched family contains new contact details (e.g., a new address, phone number, or email), CMS Cloud will add that information to the family without overwriting existing values.
After making changes, click Save Changes. When everything looks correct, check the Approved box for that submission.
Step 3: Import Approved Submissions
After you have reviewed and approved your submissions, click Import. CMS Cloud will import all submissions that are marked as Approved.
Recommendation: If you have more than 10 submissions, import one page (up to 10 submissions) at a time. This is especially important if a new donor has multiple submissions—import their first submission first, then Auto Match the rest to avoid creating duplicates.