Whether you're delivering challah and soup, Shalach Manos, Matzah or doing bikur bayis, getting to all your destinations in the fastest manner can be a challenge. Often, when looking at a report and trying to figure out which destination to visit in which order, you end up circling back to the same area unnecessarily causing frustration and wasting valuable time. This is especially true if you have volunteers who aren't familiar with your area.
CMS Cloud Routes addresses this issue in a novel and intuitive way. With a few clicks you can generate optimized driving directions to a list of Families that you define. The destination points show up on a map which you can then print to take it with you or distribute to your volunteers.
The list will show you whom to visit and it what order, and how long each destination will take. Calculations take into account current traffic conditions.
Note: If you don't have this option in your CMS Cloud, please email cloud@chabadms.com to get it enabled.
Below are step-by-step instructions
Select Families for the Map
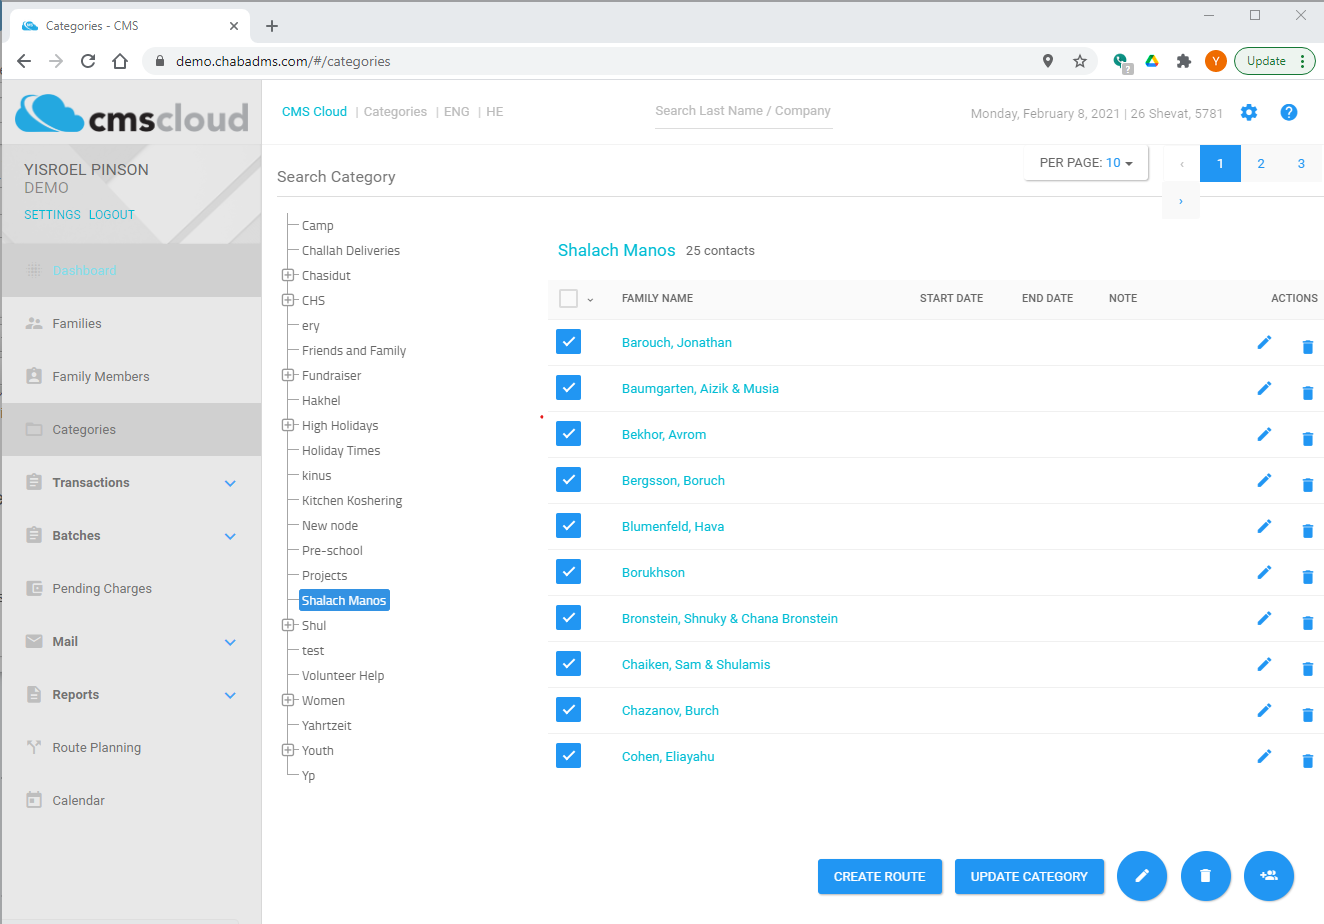
Start from a Category and see a list of all families in that category. For example, you might have a category called "Shalach Manot." You can view this category and select which names you want to start with.

Batch checking is also supported.
You can choose to "Check All" or "Check All Visible" ("Uncheck All" and "Un-check All Visible") making it easier to select many Families at a time.
When you're done selecting Families, click CREATE ROUTE (SHOW MAP). This takes you to the Routes page with the Category selected and the checked Families appear on the map.
It's important to understand that checked Families on the map are not yet part of a Route. Being checked and appearing on the map is the first step. Now they can easily be tagged and added to your Route which will be created next.
Note: You can go directly to the Routes area on the main menu. The Categories list gives you an easy way to "check all" in a category.
You can proceed to scroll through the list of Families and check or uncheck Families, adding them and removing them from the map.
- For a Family that is already checked, clicking the Family name itself will cause the map pin to bounce. This gives you a nice visual of where on the map a family is.
- Click any pin on the map to see the Family name and address.
- Click the Family name link on the pin will open a new tab showing that Family.
Tagging Selected families for the Route
As mentioned, not all families that are checked will be added to the Route which is about to be created. Also, a Route has a maximum of 25 destinations so the system can't just add all checked Families to a new Route.
This is where tagging comes in.
After you have your Families positioned on the map, the next step is to Tag them, or some of them, for the Route.
The easiest way to do this is with the lasso tool. Click this tools and then drag a circle around the pins on the map. Those Families that have their pin circled are now "tagged," indicated in the list by their route-tag icon's blue color.

You can also tag or un-tag individual Families on the list by clicking the route-tag icon directly, or by clicking a pin on the map and then clicking Tag or Remove Tag.
- If you have more than 25 Families checked and appear on the map, you need to split them into multiple Routes.
- You can use the lasso tool multiple times. Each time will tag additional names.
- You can zoom in and out of the map as needed.
- Clicking the "x" will remove the lasso from the map. Families will remain tagged.
When you're done tagging, click CREATE NEW (CREATE ROUTE).
- Name: This is the name of your new Route
- Description (optional)
- Uncheck Selected / Leave Selected.
By default, when creating a new Route, those families added to the Route will become unchecked from that Category and no longer show up on the map which that category is viewed. This allows you to more easily select the remaining checked Families and create additional Routes.
If you want to leave the Families in this route checked, choose the "Leave Selected" option.
Click SAVE. The map now shows just those Families in the Route you just created.
Click SHOW ROUTE to show the driving sequence on the map. You will be prompted to confirm your Start and End address. By default, this will be your Department's address, but you can change it to one of the Families on the route or enter any other address.
Click PRINT to print a driving report. The report includes time and distance.
Click the Email button to send the route by email to someone's device to be used in their Google Maps app.